Most homeowners never think about their sump pump until it fails. That’s understandable — it lives in a pit in your basement, it runs quietly, and when it’s doing its job there’s nothing to notice. The problem is that “nothing to notice” and “working properly” aren’t always the same thing.
Sump pumps don’t announce when they’re starting to wear out. They just stop working — usually during the worst possible moment, which in the Miami Valley means a heavy summer storm or a March thaw with saturated ground. A basic service schedule prevents most of those surprises.
Here’s what that schedule looks like, what’s involved, and what you can do yourself versus when to call a licensed plumber.
The Short Answer: Once a Year, Before Storm Season
For most Dayton-area homes, an annual sump pump inspection — ideally in late winter or early spring before the heavy rain season begins — is the right baseline. That timing puts a professional set of eyes on the system before it faces its highest workload of the year.
Some homes warrant more frequent attention. If your pump runs heavily during storms, if you’ve had water intrusion before, or if your pump is more than five years old, a mid-year check in late summer is a reasonable addition — particularly after a heavy storm season has put significant hours on the motor.
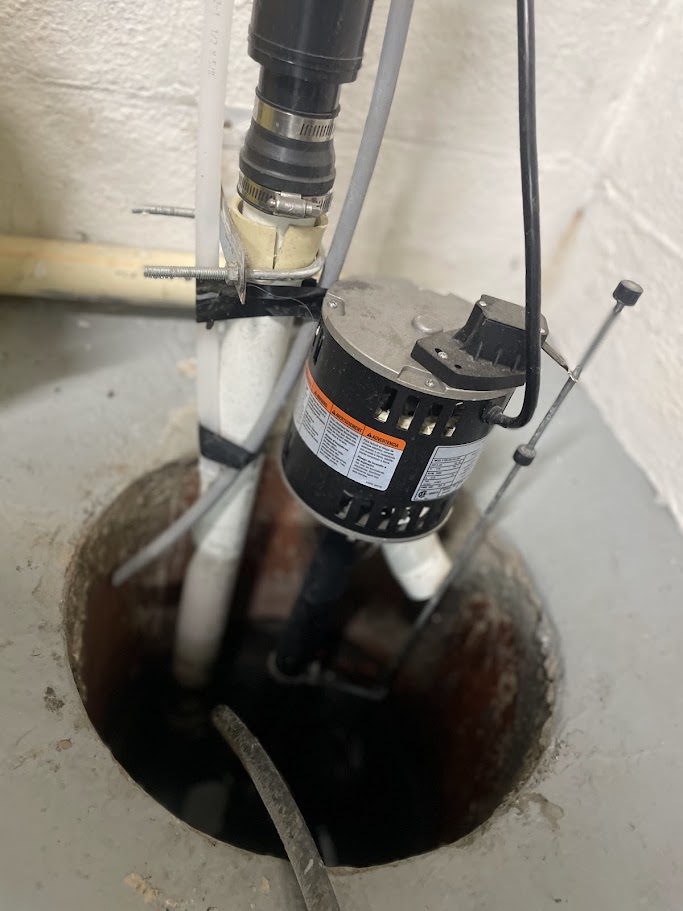
The annual inspection isn’t just about the pump itself. It’s about the whole system: the pit, the float switch, the discharge line, the check valve, and — if you have one — the battery backup. Any one of those components failing can render the whole system ineffective.
What a Professional Sump Pump Inspection Covers
When a licensed plumber services a sump pump, here’s what the inspection should include:
The pump and motor
Visual inspection for corrosion, wear, or physical damage. The pump is run through a full cycle — typically using the bucket test — to confirm it activates, moves water efficiently, and shuts off cleanly. Motor amperage may be checked on older units to assess whether it’s drawing more power than normal, which is an early indicator of wear.
The float switch
The float switch is the component that triggers the pump when water rises to a set level. It’s one of the most common failure points — floats can stick, corrode, or become tangled against the pump housing. The inspection confirms it moves freely through its full range of motion and activates at the correct water level.
The check valve
The check valve prevents water from flowing back into the pit after the pump shuts off. A failed check valve causes the pump to recycle water it already discharged — which means it runs continuously and burns out far ahead of its expected lifespan. The inspection confirms the valve seals correctly and shows no signs of cracking or wear.
The discharge line
The line that carries water out of the pit and away from the foundation needs to be clear, properly routed, and terminated at a safe distance from the house. Clogs, frozen sections, or discharge points that drain back toward the foundation are all correctable problems that go unnoticed without a periodic check.
The sump pit
Debris, gravel, and sediment accumulate in the pit over time and can clog the pump intake or interfere with the float. The pit is cleared as part of a standard service call. In homes with older pits, we also check for cracking or deterioration that could affect drainage.
The battery backup (if installed)
Battery backup systems require their own attention. The battery should be tested under load — not just checked for charge — to confirm it will actually power the pump during an outage. Battery terminals are inspected for corrosion and the backup pump is run through a cycle independently of the primary. Most sealed lead-acid batteries in backup systems should be replaced every three to five years regardless of apparent condition.
What You Can Do Yourself Between Service Calls
There’s meaningful maintenance a homeowner can handle without any tools or technical background. None of it replaces a professional inspection, but it catches obvious problems early and keeps the system running between visits.
Run the bucket test two to three times a year.
Pour a five-gallon bucket of water slowly into the sump pit. The pump should activate within a few seconds, clear the water, and shut off cleanly. This takes about two minutes and confirms the basic pump-and-float function is intact. A good time to do it: before summer storm season, after a heavy storm period, and heading into winter.
Check that the pump is plugged in and the GFCI hasn’t tripped.
It sounds obvious, but a surprising number of sump pump failures trace back to a tripped GFCI outlet or a cord that was accidentally unplugged during basement work. Verify the pump is connected and the outlet is live every few months.
Look at the discharge line outlet.
Walk outside and confirm the discharge line’s exit point is clear — no debris, no bird nests, no ice blockage in winter. The outlet should be at least ten feet from the foundation and pointed away from the house. If it’s shorter than that or directed toward a neighbor’s property line, mention it when you schedule service.
Listen when it runs.
Get familiar with the normal sound your pump makes. Grinding, rattling, or a strained hum that’s different from usual are worth paying attention to. You don’t need to diagnose the problem — just note it and mention it when you call.
How Dayton’s Hard Water Affects Your Service Schedule
This is a Miami Valley-specific factor worth understanding. Dayton’s water supply registers among the harder water areas in Ohio — high in calcium and magnesium minerals that leave scale deposits on surfaces they contact over time.
Inside a sump pump, scale buildup affects the impeller, the float mechanism, and — in systems with metal components — accelerates corrosion. Pumps in hard water areas don’t necessarily fail faster, but they accumulate internal buildup that reduces efficiency and can eventually cause mechanical binding.
For most homes this doesn’t change the annual service recommendation, but it’s a reason to be thorough about inspection rather than skipping years. If you’ve also noticed hard water effects elsewhere in your home — scale on fixtures, shortened water heater life, spotting on dishes — it’s worth a broader conversation about water treatment when we’re out for the pump inspection.
When Service Turns Into Replacement
Sometimes an inspection reveals that a repair isn’t the right answer. The indicators that point toward replacement rather than continued service:
- The pump is more than seven to ten years old and showing wear
- Motor amperage draw is significantly above rated specifications
- The housing shows physical cracking or has been repaired previously
- Repairs over the past two years have cost more than half the price of a new unit
- The pump is undersized for current water volume — common in homes that have added square footage or experienced changing drainage patterns
We’ll tell you honestly which way it goes. If a service call and a minor repair gets your pump through several more years reliably, that’s what we’ll recommend. If the economics favor replacement, we’ll explain why and walk you through the options.
Schedule Your Sump Pump Inspection
Restoration Plumbing has licensed master plumbers serving Moraine, Dayton, Kettering, Centerville, Huber Heights, Beavercreek, and the surrounding Miami Valley. If you’re not sure when your pump was last serviced — or if it’s never been inspected since you moved in — now is the right time, before summer storm season peaks.
Call us at 937-883-6633 or schedule service at www.restorationplumbingusa.com/contact/
If a pump failure has already led to water in your basement, Ram Restoration is available 24/7 at 937-885-0088. One family, fully coordinated from the first call.